

When we went full-time, we bought a new 2019 Grand Design 19RLE. I love the floorplan, but the cabinetry is all DARK, I mean really DARK - Just about black. And there's a lot of it. And it's depressing, especially since we can't travel right now.

So, I thought about painting it. But, here's the deal - you may already know that your entire RV is coated with plastic! Like contact paper adhesive vinyl. Probably a little thicker, but maybe not. Plastic is practically impossible to paint successfully. If you sand it, you risk making scuffy places that will show through the paint. And the paint's not going to stick much better anyway, because --- it's PLASTIC.
My wonderful husband came up with a great idea!!! Read on to see how I completely redid my upper cabinets with extremely minimal prep - and it won't scratch off, or peel!!!
You know what? I take lousy photos!
At night, the dark cabinets don't really bother me. In the daytime however, this place just becomes a pit. It's so dark inside, even when it's sunny.
Our previous trailer was only 15' long and it felt larger than this because the inside was all white.
I finally decided that I have to do something about this!


First, I added some pops of color by lining the glass with colorful fabric. It means I don't have to do any packing before I hit the road, the dishes are safe. This also protected the glass from dishes rubbing on it during travel. Post here.
This is what my kitchen looked like when we bought the trailer.

This is what it looks like now

This is what it looks like now
You can even cover the doors with it, if they are not real wood, or if they have a vinyl finish, or if you don't want to buy paint.
disclaimer: I did paint the doors on my cabinets because they were solid wood and easy to paint. I did it all for $5 and I'll show you how in the next post
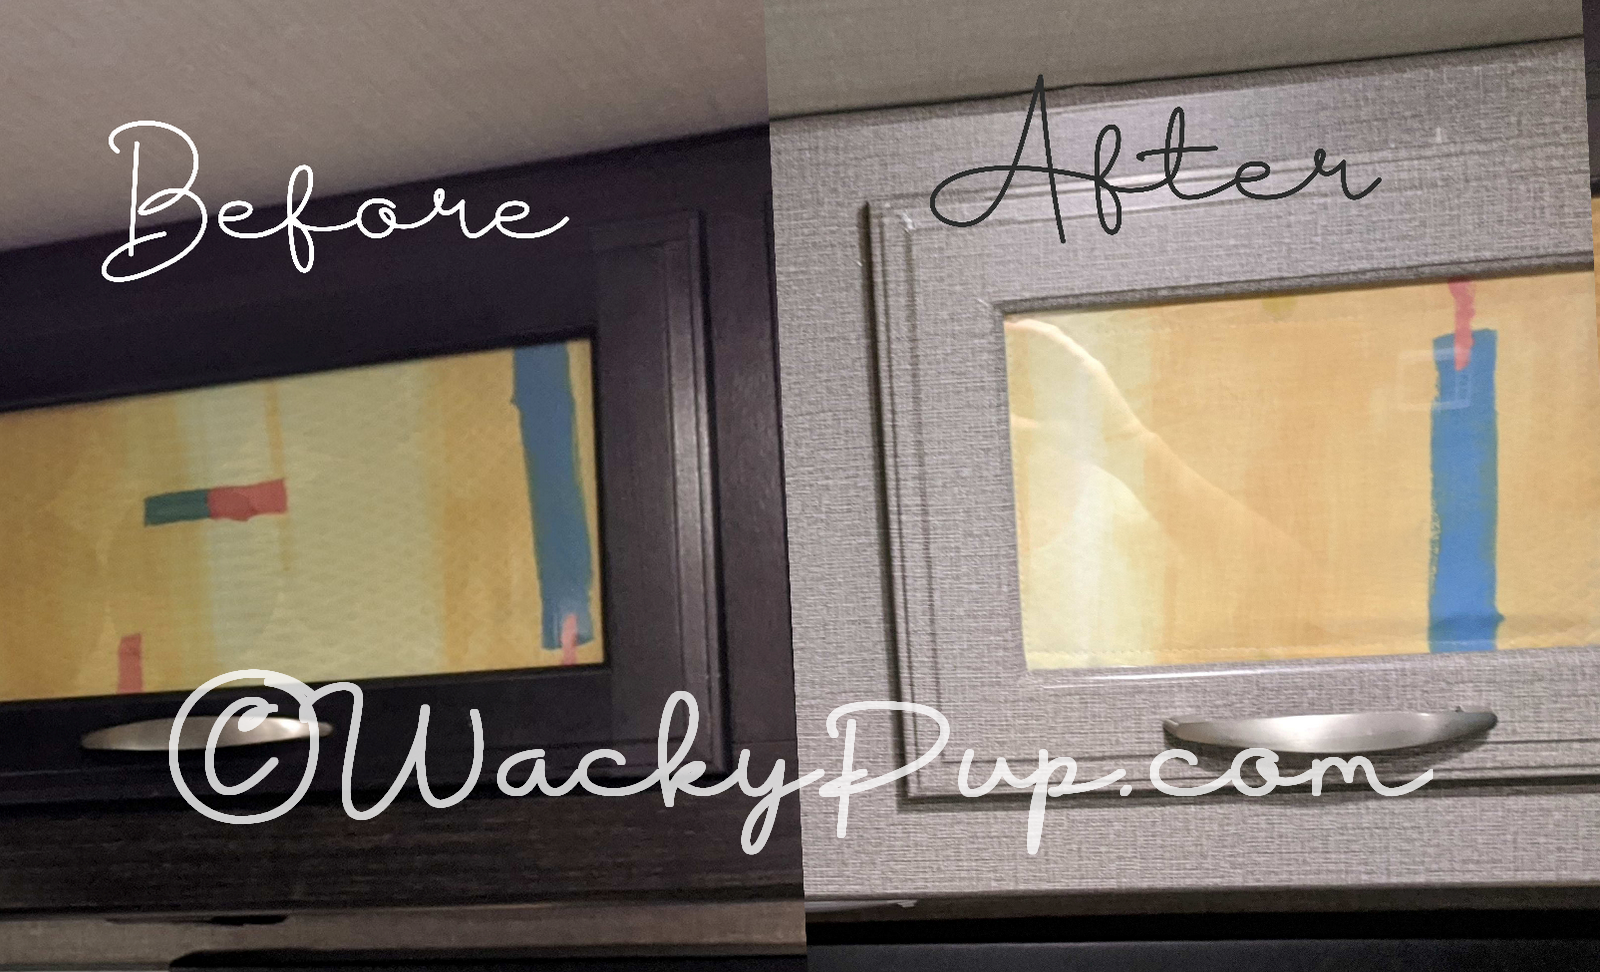
So now I have a beautiful linen finish instead of dreary black cabinets!

The photos are not good - you can't tell what a MASSIVE difference it has made!!
It is lighter, and the room feels LARGER - amazing what a little color change can do!

I admit, I did paint the frames on the kitchen cabinet doors, even saying that you don't have to paint. I did not paint the cabinets in the back. But here in the kitchen, the white frame just makes a HUGE difference!
(Grand Design owners - here is the vinyl I found that is almost exactly the same as the gray linen finish on the walls. It is a little darker, and slick, not textured, but it looks FANTASTIC!)
Really, the photos just don't show how good it looks!!!The photos are not good - you can't tell what a MASSIVE difference it has made!!
It is lighter, and the room feels LARGER - amazing what a little color change can do!

I admit, I did paint the frames on the kitchen cabinet doors, even saying that you don't have to paint. I did not paint the cabinets in the back. But here in the kitchen, the white frame just makes a HUGE difference!
Ok, let's be honest here. My entire living area is 19' long. So, this isn't really just my kitchen, it's the majority of my living room and even my bedroom. And the whole thing is only 8' wide, so it's right on top of you all the time.


Because all the cabinets are covered with vinyl, I initially thought, well, I'll just remove the vinyl. That way I can paint the wood underneath. Although it wasn't hard, and I only planned to do one cabinet, I tried it. It was a pain in the tush.
As I was doing it, my husband came in and said,"Hey, how about instead of removing the vinyl, you just replace it!"
As I was doing it, my husband came in and said,"Hey, how about instead of removing the vinyl, you just replace it!"
"What??"
"You have that nice linen finish adhesive vinyl you bought for something else,
why don't you try that?"
"Hunh"
He is much more creative than he thinks he is!
(and you can see I am quite the conversationalist)
What a great idea! You're not devaluing your cabinetry since it is already covered in vinyl. And if you change your mind, you can change the vinyl. Or remove it and go back to what it looked like originally.
I also bought some white vinyl to use under the cabinets so that the light will be reflected more efficiently.
I HIGHLY RECOMMEND THE LINEN VINYL I ORDERED FROM WALMART - CLICK HERE TO SEE IT -

I'm completely happy with the vinyl for this use.

It would be harder to match the patterns, but you can get really creative and cover them with something like this


I know, I know, the no-name vinyl on Amazon is really a whole lot prettier.
Go ahead and try it, but don't say I didn't warn you.
To 'reface' your cabinets -
Wipe them down with alcohol.
Stick vinyl on them.
That's it!
(scroll down for some tips)
You can even cover shaped molding with it -
I'm not sure which way I like it better, with the dark doors, or matching.
... what do you think?

This is what the lounge area looked like "before". It doesn't come across well, but this area is about 6'x8' and it was claustrophobic. Dark seats and dark cabinets. I tried to lighten it up with color in the glass cabinets, and bright curtains, but it was still dismal.

This is what it looks like now.


Again, the photo does not do it justice - the cabinets now kind of blend into the wall more. They are not 'in your face' like they used to be. I also covered the underside of the cabinets with white vinyl so they would reflect more of the lights that are mounted under them.

Again, the photo does not do it justice - the cabinets now kind of blend into the wall more. They are not 'in your face' like they used to be. I also covered the underside of the cabinets with white vinyl so they would reflect more of the lights that are mounted under them.

I do have a few hints.
The molding on the edge of the cabinets is just in a groove. You can pull it out to make it easier to trim around. Then stick it back in.
You can spray paint it with a coordinating color if you want.
Get the 'plastic' spray paint and it will work great.
I REALLY recommend that you buy a name brand vinyl. Really! I have bought some of the vinyl from Amazon, and it is MUCH MUCH harder to work with. It crumples up and if it sticks to itself, just forget it and throw the whole wad out. The vinyl by Con-tact and Duck brands is heavier and much easier to work with. It is very forgiving, repositionable and you can even get it apart if the adhesive sticks to itself.

You should get a smoother tool. Harbor Freight sells them, or auto stores.
You can make a really nice smoother by sticking the soft side of adhesive velcro onto one edge.

A good razor knife. I actually like this kind, you can get them at Dollar Tree. The reason I like them is you can stick the blade out really far to reach into little crevasses and areas that are hard to reach. When they get dull, just snap a new cutting edge.
A good straight edge
A tape measure

Cut the vinyl about 2" longer than the stiles of the cabinet frame so you can overlap it over the next board.
Cut all strips 2" wider than the board you are going to put them on so they can wrap around the sides.

Figure out in what order you are going to cover the stiles. Usually, I follow the original orientation of the way they're built. In this picture you can see I have done the two horizontal stiles.
Cut all strips 2" wider than the board you are going to put them on so they can wrap around the sides.
Figure out in what order you are going to cover the stiles. Usually, I follow the original orientation of the way they're built. In this picture you can see I have done the two horizontal stiles.
Next I will cover the vertical ones and finally the top and bottom of the cabinet.
The shorter, vertical strips, I just eyeballed and stuck on. Make sure they overlap the sides and top/bottom. You need to have at least 1/4" overlap so that if (when) the vinyl shrinks a little, it won't create a gap.
Here is my technique for putting on the longer pieces.

Put a small piece of masking tape on the cabinet
Mark 1" up from the rail you are covering

Align the long piece of vinyl so that it hits the marks. This will give you 1" to overlap into the cabinet.
After you get it aligned correctly, carefully remove the masking tape.

Cut the vinyl at each corner so you can fold it down over the board and into the inside of the cabinet.
Overlap all pieces at least 1/8" because the vinyl will shrink a little. I like to overlap at least 1/4"
It's best if you choose an overall pattern that won't show if you piece it together. The linen pattern I chose was perfect for this. You cannot tell where I pieced it or where it overlapped or where it was on lump. A solid color will show all this.
If you are going to cover the bottoms of your cabinets, line up the vinyl with the FRONT of the cabinet and work your way backward. I covered the bottom of 3 long cabinets before I figured that out. I was trying to stick it along the back, against the wall, first. Much easier to line up the fronts and then press it back.

The shorter, vertical strips, I just eyeballed and stuck on. Make sure they overlap the sides and top/bottom. You need to have at least 1/4" overlap so that if (when) the vinyl shrinks a little, it won't create a gap.
Here is my technique for putting on the longer pieces.
Put a small piece of masking tape on the cabinet
Mark 1" up from the rail you are covering
Align the long piece of vinyl so that it hits the marks. This will give you 1" to overlap into the cabinet.
After you get it aligned correctly, carefully remove the masking tape.
Cut the vinyl at each corner so you can fold it down over the board and into the inside of the cabinet.
Overlap all pieces at least 1/8" because the vinyl will shrink a little. I like to overlap at least 1/4"
It's best if you choose an overall pattern that won't show if you piece it together. The linen pattern I chose was perfect for this. You cannot tell where I pieced it or where it overlapped or where it was on lump. A solid color will show all this.
If you are going to cover the bottoms of your cabinets, line up the vinyl with the FRONT of the cabinet and work your way backward. I covered the bottom of 3 long cabinets before I figured that out. I was trying to stick it along the back, against the wall, first. Much easier to line up the fronts and then press it back.

Ok, the internet is very slow tonight and it has taken me forever, so I'm not going to fine-tune this anymore tonight. If you have any questions, please ask, and if you do this to your cabinets, please share!!
Now Go Play Outside!
Liz


No comments:
Post a Comment
Thank you so much for taking the time to share a comment. If you have a question please use the CONTACT FORM at the top right of the blog to contact me. I can't answer your questions through the comments section. I don't know how to fix this so just use the contact form and I can answer any question you may have. Thanks!