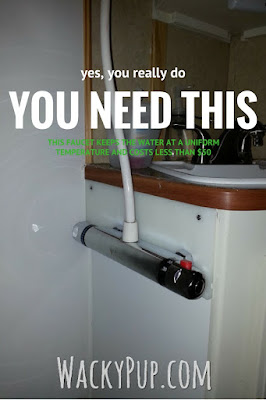
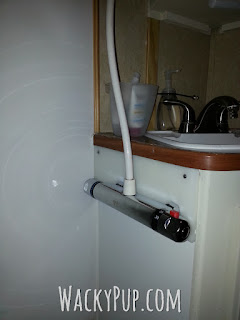
This was written to install a thermostatic mixing faucet, but really, you could install any faucet using this method.
I decided to wait until we got home from camping to install the new faucet for the shower. You can see quite a few to choose from here (scroll down to mid-page) Some are really neat - square, or narrower than the one I got.
I'm really glad I did! It was more complicated than I planned (isn't it always?) For your convenience, I have posted affiliate links to the actual products I used. Thank you for supporting this site with purchases made through links in this article. I really do appreciate it!
I'm really glad I did! It was more complicated than I planned (isn't it always?) For your convenience, I have posted affiliate links to the actual products I used. Thank you for supporting this site with purchases made through links in this article. I really do appreciate it!
There are a couple issues with installing this faucet on a flat wall with flexible supply lines. The first is that the fittings that come with it are offset because it is actually designed to be installed into threaded copper pipes so it doesn't need any additional support. Since I am putting it through the side of a cabinet, I have to have a way to support it.
I thought it would fit right through the cabinet, but it was just not workable.
I got a couple of these white plastic cutting boards at Ikea where they were really CHEAP and started playing. (If you don't have Ikea, Walmart probably has some - they need to be about 1/4" thick minimum, and large enough to cover the area behind the faucet.)


I drilled holes using a spade bit I drilled holes sized to fit the larger end of the fitting.
The fittings were just long enough that when I put the water supply lines they did not snug down enough to keep the faucet steady. I also wasn't really comfortable leaving just the supply lines to hold the heavy faucet up.
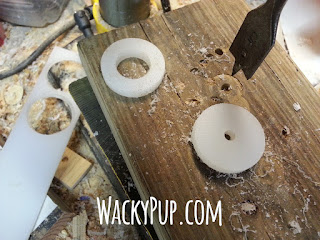
I cut washers out of one of the cutting boards. First I cut a circle out with a hole saw. Then I used a spade drill bit to cut the hole out in the center of the circle. I also used a rasp to make one side thinner to go over the odd offset of the fitting. You can kind of see it in the photos below.
Next, I needed something very thin that would hold it all together and make it very stable.
Next, I needed something very thin that would hold it all together and make it very stable.
Conduit lock nuts were PERFECT! They come with lock nut and washer and threaded on to the pipe threads perfectly - who knew?? You can get them on Amazon, but I don't think they come with a washer there.
First the plastic washer I made from the cutting board, then the metal washer, then the lock nut.
Very tight and sturdy!
Test fitting the supply lines.
After this it was a simple step to drill large holes in the cabinet that would accommodate the fittings.
Ok not quite so simple (first I was running into my tiny sink, then the drain pipe was in the way.) Third time's the charm!
Next I screwed the cutting board to the cabinet. I ran a bead of caulking around the back of the board and used stainless steel screws so they would not rust. The lip of the cutting board fits up under the bathroom countertop to minimize exposure to water.
Now that the faucet itself was taken care of, I had to figure out how to attach it to the existing water supply lines. First I bought all this stuff
VERY expensive push fittings and a piece of pex line. I had to buy a T joint for each line ($10.24 ea) and then two adapters to make it fit the supply lines to the faucet ($6.85/ea) AND a piece of pex line ($7) for a total of almost $45 with tax! That's more than the faucet cost! Not counting the flex supply lines (I would need them for any installation)
Talking to someone on a rv discussion board, they mentioned they used Flair-It fittings. Wow! What a discovery! I could buy one fitting for $6 to do the job of $16 of the expensive fittings and I wouldn't need that additional pipe! Thanks so much AnEv942!
Here is what the fittings look like. You can get them on Amazon for around $6 each and they come in all kinds of configurations.
I cut the existing sink supply lines and removed about an inch, using a pvc cutter. I did take a photo, but I can't find it and I'm not emptying out that cabinet again just to show you. Take my word for it, these cutters are great!
I highly recommend investing the $9 in a cutter if you're going to anything with pvc. I was using my compound miter, but this is much easier, and very accurate. I have a great thing you can make with pvc - you might want to make these nifty pvc awnings - fully adjustable and removable
Ok, back to the sink. Since I was also replacing sink faucet I took the piece in with me and you can see how it actually fits together. The white fitting on the right end is the part that attaches to the faucet.
First you slide the nut onto the line, then push the pex line over the nipple end very tightly.
Then simply screw down the nut. I thought I should probably do as much assembly in my kitchen as I could so I didn't have to fumble around under my tiny little sink cabinet. So after attaching one end of the T to the pex I attached faucet supply line, and then I took it back to the camper.
Attach the other ends to the supply lines and attach supply lines to the faucet!!
While you're working on your plumbing it might be a good time to put these around the trailer. This is another instance of learning from others. These alarms come highly recommended by RVers.
Here's the bonus - More Hidden Storage
At the back of the shelving in the cabinet, there was a large open space that the pipes ran through. I cut a piece of thin plywood/masonite that fit around the pipes and screwed it down. You can see how much will fit in the previously unusable area! Now nothing falls down the back anymore, either!
Ta Dah!! Now I need to go camping and try out my new shower! I would love to hear any comments or suggestions you have about my mods!
Go Play Outside!!!


Great ideas! I saw one of your older posts about the IKEA bedside lights. They now have rose gold/copper color clip on bendy LED lights! They are not 12v but they REALLY illuminate a book or area. I found that when clipped to a thin tote box at the head of my bed they were too tippy BUT discovered that if I turned the clip part around (so that the light part curves over from the "back" side) it worked perfectly. Nice long cord and an "on cord switch" for positioning. I also use a binder clip to corral the charger etc cords on to these sort of totes or other edges; remove the wire part; run the cord (phone; tablet; electrical) thru it; replace the wire part and clip where needed. Keeps the cord from wandering off and if the bubsiness end is too small and slides thru just use a piece of tape to close off part of the wore area. I also love your use of the "nylon" cutting boards; we have used them for re-inforcement of saddle bags on our motorcycle and also for making an extension to the rear luggage rack on the bike to prevent sagging bags. As we are planning to move into a vintage RV in the next few months I can use all the tips and hints I can get! Keep up the good work!
ReplyDeleteThanks! It's nice to hear that putting up the blog has been helpful! The IKEA lights are not 12v in my camper, either, I just have them plugged into a power strip over the bed. I like your idea about the clips. Funny enough, I made saddle bags for our bikes using cutting boards from the dollar tree for stability, probably the same way you did!. I am in the process of writing up the post :) Thanks again for taking the time to comment - it is appreciated :)
ReplyDelete